Wednesday 27 October 2010

NOTD – Halloween Manicure No.2

Blood soaked nails look

This is my second Halloween manicure attempt, and my first experience with sponge nail art. This look was achieved using the following items:

OPI Nail Lacquer in Passion, Konad Special Stamping Polish in Red, Seche Vite Top Coat, Scotch Brite Kitchen Sponge (Cut up), Konad Sponge Art Palette 


OPI Chip Skip
Base Coat: OPI Nail Envy (1 coat)
OPI Passion (2 coats)
Top Coat: Seche Vite (to ensure nails dry quick for sponging)
Konad Special Polish in Red applied with cut up sponge: apply special polish to palette and dab with sponge, first apply thick colour along tip then as the colour wears off the sponge; apply further down the nail to achieve bleeding gradient effect
Top Coat Seche Vite (3 mins after sponging not to smudge)


I really enjoyed trying out sponge nail art with this manicure, will definitely try and achieve something similar for a Christmas snow effect :D

OPI Go Goth Mini Set Halloween 2010 with NOTD & (faux) KOTD

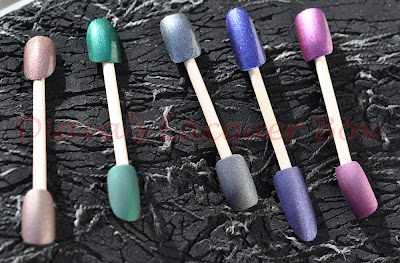
There’s something a little strange about this particular mini set, over in the US it is called OPI Go Goth Minis for Halloween 2010, but over here in the UK, it is called Couture Colour. There is also no free lace cuff bracelet with the set in the UK, but the colours in both sets are identical. Strange... perhaps they can justify charging more for this set in the UK by giving it a name like "couture colour"? Anyway I absolutely love these colours and here are swatches of the four minis on my colour wheel: 


1. Mini OPI Nail Lacquer in Obscurity - matte black polish, looks like charcoal to me, can be made shiny with top coat
2. Mini OPI Nail Lacquer in Unripened - (this one is also available in big size) A shiny black polish with stunning green/teal glittery undertones 
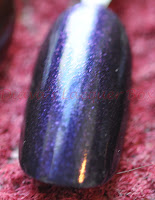
3. Mini OPI Nail Lacquer in Nevermore - blue/purple shimmery polish, like OPI Ink
4. Mini OPI Nail Lacquer in Sanguine - blood red maroon colour, absolutely stunning looks black around the edges. 

The following photograph, although blurry, does show the true colour of Nevermore, its purple undertones usually come out quite blue in photos, but this is the real colour you will get on the nails:


First NOTD - OPI - Sanguine (3 coats) with Inglot glitter flakies (202) on top (base coat OPI Nail Envy, Top Coat Seche Vite)

no flash
with flash
Recently discovered the flakies, initially I was on the search for GOSH - Rainbow, but unfortunately none of the superdrugs I went to had the polish in stock :(, however luckily Inglot in Westfield (London) had a beautiful range of flakies, I went with no. 202, as it was the most similar to Rainbow, and I'm not disappointed :D its stunning, and looks different over every colour, especially liked it on sanguine, brought out so many different hues and shimmers, this top coat reminds me a little of the effect you get from crackle polishes, except I think I prefer it :D so many pretty colours :D

here is how the Inglot 202 flakies top coat looks on white (OPI Alpine Snow)


Here is 3 coats of OPI Unripened:

KOTD - OPI Unripened with Art Deco plate A83 and A2(these are duplicates of Konad plate M50 and M3) the Art Deco plates are a bit cheaper than the konad ones, but since I now have the Konad plates, I can definitely see a difference in quality, although the images are the same, the Art Deco plates lack the detail of the konad ones, and are slightly thicker, but they work fine with all the Konad special polishes, I was not too impressed with Art Deco's special polishes (tried them in store), the white just wasn't as opaque, but still they are definitely a good range for people in the UK, who want a cheaper alternative to Konad, 

OPI Chip Skip
OPI Unripened 3 coats
Top Coat: Seche Vite (ensures the nails are completely dry for Konading)
Konad Special Polish in White and art deco plates A83 and A2 (see above for the Konad equivalents)
Top Coat: Seche Vite (about 5 mins after konading, and in three strokes not overlapping)

More Halloween nail goodies to follow :)


Monday 25 October 2010

NOTD - Halloween Manicure No.1


Left Hand
OPI Chip Skip
Base Coat: OPI Nail Envy 1 coat
China Glaze Liquid Leather 3 coats
(I originally started with every other finger orange, but I didnt like the final effect so went over the orange ones with China Glaze Liquid Leather 2 coats)
Top Coat: Seche Vite (to ensure nails are completely dry for decals)
Nail art: Instant Nail Art by Nailtopia, gently slid each sticker off by rubbing a hoof stick under the decal slowly shaking the stick to free the sticker, then applied to the nail.
Top Coat: Seche Vite to seal the design

Left Hand
Left Hand
Right Hand
Right Hand


some close ups to show the glitter on the designs, isn't the waving skeleton cute :D


all photos taken indoors with flash

Had a lot of fun doing this one, and although I really want to try some other ideas for Halloween manis I just cant bring myself to take this one off, its day 4 and it shows no signs of chipping :)

Friday 22 October 2010

NOTD & KOTD holographic goodies from GOSH and OPI Designer Series

I recently discovered holographic polishes, and they are absolutely gorgeous, photos really do not seem to do them justice :) however some are definitely more holo than others so here is a comparison of some of the holos in my collection. 

NOTD - GOSH - Holographic

OPI Chip Skip
Base Coat: Make up Store Aqua base coat (very good for holo shades) 1 coat
Gosh Holographic 1 coat
Top Coat: Seche Vite (this dulls the holo effect, however if you put another coat of the holo on top the effect returns and layering with Seche Vite really helps the mani last, as without this it only lasts 1 day max, and with the layering of seche vite i had this on at least 3 days with no chipping :) )
Gosh Holographic 2 coats

with flash
extreme close up holo goodness
Gosh Holographic is definitely one of the most holographic polishes in my collection, but it is definitely not the easiest to apply, the aqua base coat from Make Up Store definitely helps it go on smoother, and layering a coat of seche vite between coats of the polish definitely helps its durability, just make sure you finish with 1-2 coats of the holo colour, as leaving seche vite on top definitely dulls the holo :( but since this polish is very quick drying it really helps to layer up with top coat!


KOTD - OPI Designer series Original

OPI Chip Skip
Base Coat: OPI Nail Envy
OPI Designer Series Original 3 coats
Top Coat: Seche Vite (ensures the nails are completely dry for Konading) also good to note that top coat does not take away the effect of holo from any of the OPI Designer series :)
Konad Special Polish in Black Pearl and Konad Plate M63 
Top Coat: Seche Vite (about 5 mins after konading, and in three strokes not overlapping)
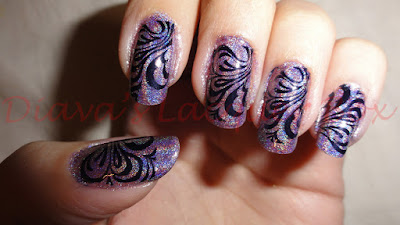
with flash
apologies for the roughness of this mani, I foolishly took the photograph before cleaning up the edges, oops, will try remember not to do that again :D

This polish is definitely my fave from the OPI Designer Polishes that I own, it is the most holographic by far, and although not quite as holo as GOSH or Make Up Store (See below for a swatch of that one) it is definitely the easiest to apply, goes on like a dream, dries pretty quick, and best of all responds brilliantly to top coat. Top coat does not dull the effect at all, if anything it makes it even shinier :D 

Here are some swatches from my holo collection:


Left to Right
Make Up Store: Siw Hologram (with Make Up Store: aqua base coat)
GOSH cosmetics: Holographic (with Make Up Store: aqua base coat)
OPI Designer Series: Coronation
OPI Designer Series: Classic
OPI Designer Series: Original
OPI Designer Series: Reflection
OPI Designer Series: Extravagance
OPI Night Brights: My Private Jet (unfortunately mine is not the super holo version of this polish, but it is still gorgeous)

The make up store and Gosh holos are definitely the most holographic in the bunch (though it is worth noting that the GOSH holographic is substantially cheaper), they are both harder to apply and do not respond well to top coat, but they do look absolutely stunning. And the good news about the Make Up Store Collection (I just have the blue at the moment, they also have a gold holo, standard silvery holo, and a purple/pink one) is that none of them are limited edition, the sales lady assured me they aren't going anywhere :D which is awesome, as I was never able to get my hands on any China Glaze OMG polishes and the Nfu. Oh ones are quite hard to find also. For peeps in London, The Make Up Store can be found upstairs in Westfield Shopping centre, I believe they also have a store in Central London :).

The OPI Designer series is definitely the easiest to apply with Original being the most holographic of the ones I own, Reflection is probably the least holo, but it is a beautiful red :) Classic and Original are a little more holo then they look in the photo, but the effect is definitely more a scattered holo than Original.

The rest of my holo collection will hopefully be popping up in more NOTDs and KOTDs in the not too distant future, I still have a few other polish swatches to post and I am about to get started on some halloween manis shortly :D

Thursday 21 October 2010

OPI Suede Collection Swatches

Some Swatches from the OPI Suede collection, all 3 coats (no base coat)

From left to right: 
OPI Ink - Suede
OPI Here Today... Aragon Tomorrow - Suede
OPI Suzi Skis in the Pyrenees - Suede
OPI We'll Always Have Paris - Suede
OPI You Don't Know Jacques! - Suede

top row with top coat, bottom row without

From left to right: 
OPI You Don't Know Jacques! - Suede
OPI Here Today... Aragon Tomorrow - Suede
OPI Suzi Skis in the Pyrenees - Suede
OPI Ink - Suede
OPI We'll Always Have Paris - Suede

Individual Swatches (all photos taken outside no flash)
Seche Vite top coat used in photos with top coat.

OPI You Don't Know Jacques! - Suede

suede finish
with top coat
with top coat

OPI Suzi Skis in the Pyrenees - Suede

suede finish
with top coat
with top coat
with top coat


OPI Ink - Suede

suede finish
with top coat
with top coat (truest to colour pic)
Much like OPI Ink, its suede counterpart is equally hard to photograph, and often appears more blue in photos, it is more purple based in real life, so the last photo is the most accurate :)


 OPI Here Today... Aragon Tomorrow - Suede

suede
with top coat
with top coat

OPI We'll Always Have Paris - Suede 

suede
with top coat
with top coat
with top coat

Really love this range, without top coat the polish does not last quite as long, but its very quick drying so that makes its more worth it :D Also looks awesome with Konad Stamping. The suede collection looks particularly stunning with a top coat, very glittery and sparkly, its like having two polishes for the price of one :)

KOTD - OPI Here Today... Aragon Tomorrow Suede with Konad Plate M24

Todays KOTD was done using OPI Here Today... Aragon Tomorrow Suede and Konad plate M24. Not the most exciting mani, just getting to grips with Konading :)


OPI Chip Skip
OPI Here Today... Aragon Tomorrow Suede 2 coats
Top Coat: Seche Vite (ensures the nails are completely dry for Konading)
Konad Special Polish in White and plate M24 french plate
Top Coat: Seche Vite (about 5 mins after konading, and in three strokes not overlapping)


with flash

with flash

no flash

I really love the OPI Suede range, and they look just as stunning with a top coat, it really brings out the glittery colours in the polish, have done some swatches of more of the suede range with and without gloss, pictures to follow :D